


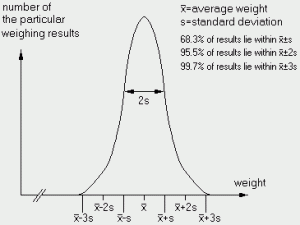
Rule 1 (statistical distribution): If a measurement is repeated a sufficient number of times and the frequency distribution of the individual values is plotted in a graph, you will obtain a characteristic curve, the so called gaussian curve.
(as shown below):
 |
|
Rule 2 (error propagation for sums and differences): In sums or differences the squares of the absolute individual errors are added and the square root of this sum is taken.
Example: Container with a tare weight of 205.171g measured with an absolute error of 1mg.
After filling, the container measured a gross weight of 210.213g, again with an error of 1mg.
This yields a net weight of 210.213g – 205.171g = 5.042g.
The absolute error of the net weight is: ![]() ((1mg)2; + (1mg)2;) = 1.4mg
((1mg)2; + (1mg)2;) = 1.4mg
and the relative error is: 1.4mg / 5.042g = 0.028%
Even though the individual measurements reveal only a relative error of 1mg / 200g = 0.0005%, the relative error of the difference increases to 0.028%.
Rule 3 (error propagation for products and quotients): In products or quotients the squares of the relative individual errors are added and the square root of this sum is taken.
Example: Density determination in accordance with the equation ![]() = mass / volume.
= mass / volume.
measured mass m = 150.27g ![]() 0.01g, measured volume V = 173.4cm3;
0.01g, measured volume V = 173.4cm3; ![]() 0.1cm3;.
0.1cm3;.
calculated density ![]() = m / V = 150.27 / 173.4 = 0.866609g/cm3;.
= m / V = 150.27 / 173.4 = 0.866609g/cm3;.
Error calculation: The relative error of the mass is 0.01g / 150.27g = 0.666![]() .
.
The relative error of the volume is 0.1cm3; / 173.4cm3; = 5.77![]() .
.
The relative error of ![]() is
is ![]() ((0.666
((0.666![]() )2; + (5.77
)2; + (5.77![]() )2😉 = 5.80
)2😉 = 5.80![]() .
.
The absolute error of ![]() is 5.80
is 5.80![]() . 0.866609g/cm3; = 0.5.10-3g/cm3;.
. 0.866609g/cm3; = 0.5.10-3g/cm3;.
Thus, the final result is: ![]() = (0.8666
= (0.8666 ![]() 0.0005)g/cm3;.
0.0005)g/cm3;.
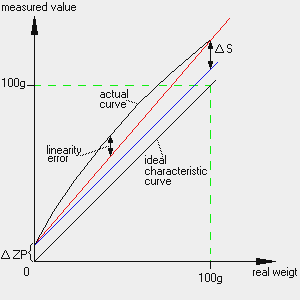
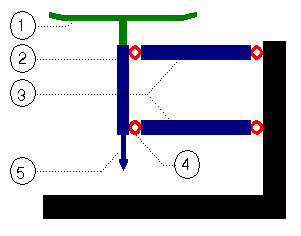
The characteristic curve can be shifted by a constant amount, the zero error![]() ZP (the blue line). This error is eliminated by correctly setting the balance to zero before weighing. Therefore, the zero error plays a role only during prolonged measurements, during which the object being weighed cannot be removed from the pan.
ZP (the blue line). This error is eliminated by correctly setting the balance to zero before weighing. Therefore, the zero error plays a role only during prolonged measurements, during which the object being weighed cannot be removed from the pan.
If the slope of the curve deviates from the ideal characteristic curve (red line), this is known as sensitivity error![]() S. A sensitivity error has a negligible effect for small weights or weight differences, but greater for heavier weights. As a result, the sensitivity error is always specified as a relative figure; e.g. 2mg/100g, 20ppm. A sensitivity error can be caused by temperature drift, aging, adjusting with an incorrect calibration weight, or by incorrect adjustment for compensation of an off-center load error (
S. A sensitivity error has a negligible effect for small weights or weight differences, but greater for heavier weights. As a result, the sensitivity error is always specified as a relative figure; e.g. 2mg/100g, 20ppm. A sensitivity error can be caused by temperature drift, aging, adjusting with an incorrect calibration weight, or by incorrect adjustment for compensation of an off-center load error (![]() S will then be dependent of the position of the sample on the weighing pan).
S will then be dependent of the position of the sample on the weighing pan).
The curve can also be arched: This is known as linearity error (or linearity). The maximum linearity is usually listed in the specifications of a balance.

Other errors: the effects of moving the balance to a different location.
Non- horizontal position of the weighing instrument: Accurate balances are fitted with a spirit level (this is even mandatory on legally verified weighing instruments) for always being able to find back the reference position after moving the instrument: this is the position in which the instrument was correctly adjusted. In the reference position the direction in which the force (the weight) is measured is the same as the direction of gravity. If, for instance, the weighing instrument is moved to a table that is not level, but is tilted 5mm on a length of 1m, and it is not set level again, the direction of measurement deviates 0.2865° from the reference position. The measured weight value W will then be cos0.2865 smaller (W1 = cos0.2865.W = 0.9999875.W), that means on a weight of 200g a 2.5mg lower readout. The zero setting also changes: the zero point is also a weight value, it is the weight of the empty weighing pan.
When in the reference position the direction of measurement exactly coincides with the direction of gravity, the result will always decrease when the instrument is tilted, when this is not the case, the error can be plus or minus. On weighing instruments with a small number of measuring steps (up to about 10000 digits) the influence of a not horizontal position under normal circumstances is negligible, therefore these often don’t have a spirit level: “level on the face of it” will then be good enough. On a classical two-armed balance the effect is again different: on the comparison of two weights there will be no influence, both scales will always hang straight below the measuring point (suspension point). But if the last digits of the difference between the weights are read by a pointer on the arm an error will occur in the sensitivity of this pointing device.
Moving the weighing instrument in height: As the force of attraction (= gravity) between two objects (the earth and the object being weighed) depends on their distance, the measured value will change when the weighing instrument is moved to a different height. By every meter elevation (at moderate heights) the field of gravity changes from sea level -0.3086![]() N/(mkg). Or as a more practical figure: when the weighing instrument is placed one floor higher (about 4m), a weight of 200g will weigh 0.26mg less.
N/(mkg). Or as a more practical figure: when the weighing instrument is placed one floor higher (about 4m), a weight of 200g will weigh 0.26mg less.
Moving over a larger distance: The acceleration of gravity g is not the same everywhere on earth: As a consequence of centrifugal forces caused by the earth’s rotation it is less at the equator than at the poles. Also the earth is not a perfect sphere: the distance from the surface to the earth’s center of gravity is larger at the equator than at the poles.
The absolute deviation caused by moving the instrument can be considerable larger than the error of the weights used for adjustment (and larger than the maximum permissible errors for verified weighing instruments). Therefore after moving to a different location readjustment is necessary. Many weighing instruments are fitted with a built-in adjustment weight for this purpose: with this the sensitivity deviation caused by relocating the instrument is easily corrected.
Other errors: forces working on an object being weighed.
Air currents / drafts: These are often the cause of large random errors, as the effect of air currents depends on unpredictable circumstances like the shape and size of the object being weighed, posture and movements of the operator, or opening doors. Sometimes the metrological demand for the least possible air currents collides with safety requirements: Poisonous substances must be weighed in a fume cupboard. To minimize the effect of ambient air flow, draft shields are used. For balances with a readability of 1mg, an open draft shield, e.g., in the shape of a glass cylinder, will suffice under normal conditions. Balances with a readability of 0.1mg or less require a closed draft shield. Contrary to practical considerations, a draft shield should be as small as possible from a metrological viewpoint, because internal drafts can be generated within a large draft shield chamber.
A special case of air-current effect is what happens when the object being weighed does not have the same temperature as the balance an the surrounding air: Convection currents will make objects that are hotter appear to be lighter and those that are colder, heavier. Only when the shape, surface, and temperature of the object is exactly known, this will be a quantifiable error (see under the chapter “tables” the one about the temperature effects on weights). It is always important to condition an object being weighed to the ambient temperature!
Adsorptive layer of moisture on the surface: Allowing an object sufficient time to reach the same temperature as that of the weighing instrument is also necessary in order for the adsorptive layer of moisture on the surface of the object to equilibrate. Particularly when small objects are weighed on a high-resolution balance, this is essential to obtain reproducible weighing results. To minimize adsorption of humidity, users must avoid soiling or otherwise touching the objects with their hands, for example, as this leaves fingerprints, which can affect the weighing results (a fingerprint does not only have a weight of its own of 0.1 – 1mg, but is also very hygroscopic).
Electrostatic forces: These are generated when nonconductive objects or containers (glass or plastic) are electrically charged, for example, by pouring from one container to another or by air currents. Static electricity can be prevented by maintaining sufficient air humidity (at least 60%), or by using an electrically conductive enclosure that is connected to the weighing pan. Other solutions: Let the sample condition on a metal plate that is connected to the same electrical ground as the balance, ionize the air in and around the balance with an ionizing blower, don’t use a plastic draft shield or sample container: plastics are more easily electrically charged than glass.
Electrostatic forces usually show up as a drift in the weighing results (the balances readout seems to stand still after placing the sample on the pan, but than slowly starts to drift in one direction), or in poor reproducibility in repeated weighing procedures.
Magnetic forces that act on an object being weighed can be counteracted only by carefully demagnetizing the object, by shielding the magnetically active object using soft magnetic materials such as mumetal, or by keeping the object at sufficient distance from all magnetic or magnetizable parts. Weighing instruments with electromagnetic force compensation contain magnetic parts (which are usually well shielded), but even on a mechanical balance the earths magnetic field can have a considerable effect on a magnetized sample. Magnetic forces generally manifest themselves in poor reproducibility of the results and, particularly, in a strong dependency of the position of the object on the weighing pan. An often made mistake is weighing a liquid sample with a magnetic stirrer still in it: This can only be done on a specially prepared scale that always keeps bottle and stirrer in the same position and compensates for the error, or a scale that weighs while stirring; the error than becomes an alternating effect which can be filtered out.
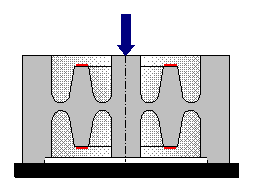
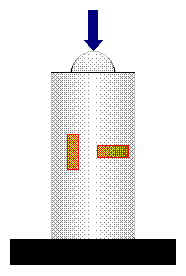
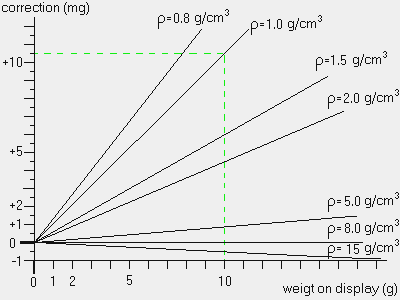
Air buoyancy: An effect which is often underestimated, is air buoyancy: Every object is subject to an upward force, which is equal to the weight of the displaced air. Therefore, this force will be larger on an object with a large volume (low density), and smaller on an object with high density. A weighing instrument compares two forces; the force exerted on the pan by the object being weighed, and the force exerted by the standard weight that was used to adjust the instrument (or the compensation weights in the case of a mechanical balance). The effect is a difference in display dependent on the density of the object, as depicted in the following graph:
The effect of air buoyancy can be calculated by the following equations:
The force of air buoyancy “A” is equal to the weight (force) of the displaced air:
| In which: g = local gravitational acceleration m = mass of the object mA = mass of the displaced air | Vm = volume of the object |
The readout of the weighing instrument “mw” can be calculated from the real mass “m” in this way:
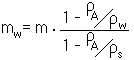 | mw = displayed value m = real mass of the object |
Resolved to the real mass “m” the equation above yields: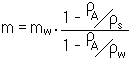
There are several ways to determine the air density “![]() “, both by calculation and measurement:
“, both by calculation and measurement:
| In accordance with the equation recommended by the “Comité International des Poids et Mesures”, for the air density |
| Where: p = barometric pressure in Pa T = air temperature in Kelvin Z = real gas factor (Z = 0.9996….0.9997 between 15°C and 25°C and p = 0.1MPa Xco2 = content of CO2 in % by volume Xv =molar fraction of water vapor |
As the molar fraction of the water vapor is generally unknown, and only the relative humidity is known, the following formula for approximation is frequently used:
| Where: p = barometric pressure in mbar T = temperature in Kelvin (T = 273.15 + t, t = temperature in °C) Q= relative humidity in % | |
| Ps = saturation vapor pressure of water in mbar, according to the following table: |
| Temperature t in °C | |||||||||||||||||||||
| Ps in mbar |
This will yield a value for the air density with an accuracy of 3 decimals, depending on the accuracy of the measurements used. More accurate calculations are possible; for this refer to various textbooks.
Another possibility is measuring the air density directly using a balance and two objects of (about the same) known mass m1 and m2 and different known volumes V1 and V2. The difference of measured weight of these two objects will be:
If the test objects have exactly the same mass and a difference in volume V1-V2 = 1 cm3; exactly, the displayed difference ![]() is equal to the air density in g/cm3;.
is equal to the air density in g/cm3;.
Sartorius supplies a set of two test weights with different densities for air density determination. In addition, the Sartorius MC-series of microbalances features a built-in software program called “Eureka” for air buoyancy correction. This program allows both air density determination and buoyancy correction without the need for pocket calculators or external computers.
Tables and Figures
Common legal units, multiples and parts of the kilogram:
| Nanogram | ng | 1 ng = 1 |
| Microgram | µg | 1 µg = 1 |
| Milligram | mg | 1 mg = 1 |
| Gram | g | 1 g = 1/1000 kg |
| Kilogram | kg | base unit |
| Ton | t | 1 t = 1000 kg |
| Carat | ct | 1 ct = 20 mg = 20 |
Remark: The carat is only allowed as a unit for weighing gold, pearls and precious stone.
Anglo-American and other weight units:
| Pound | lb | 2.2046 LB | 453.595 g |
| Ounce | oz | 35.274 oz | 28.349 g |
| Troy ounce | oztr | 32.1505 oztr | 31.104 g |
| Grain | gn ( gr ) | 15432 gn | 0.06480 g |
| Pennyweights | dwt | 643.02 dwt | 1.55517 g |
| Mesghal | m | 217.00 m | 4.6083 g |
| Momne | m | 266.70 m | 3.7495 g |
| Tola | t | 85.733 t | 11.664 g |
| Baht | b | 65.790 b | 15.200 g |
| Hongkong Teals | TL | 26.717 TL | 37.429 g |
| Singapore Teals | TL | 26.461 TL | 37.792 g |
| Taiwanese Teals | TL | 26.667 TL | 37.500 g |
| Chinese Teals | TL | 26.455 TL | 37.799 g |
| Carat ( Karat ) | CT ( k ) | 50000.0 CT | 0.02000 g |
A brief history of balances
Refer to the section on terms and definitions
Error limits for calibration weights (OIML R111):
| Nominal mass value | Class E1 | Class E2 | Class F1 | Class F2 | Class M1 |
| 50 kg | 25 | 75 | 250 | 750 | 2500 |
| 20 kg | 10 | 30 | 100 | 300 | 1000 |
| 10 kg | 5 | 15 | 50 | 150 | 500 |
| 5 kg | 2.5 | 7.5 | 25 | 75 | 250 |
| 2 kg | 1.0 | 3.0 | 10 | 30 | 100 |
| 1 kg | 0.5 | 1.5 | 5 | 15 | 50 |
| 500 g | 0.25 | 0.75 | 2.5 | 7.5 | 25 |
| 200 g | 0.10 | 0.30 | 1.0 | 3.0 | 10 |
| 100 g | 0.05 | 0.15 | 0.5 | 1.5 | 5 |
| 50 g | 0.030 | 0.10 | 0.30 | 1.0 | 3.0 |
| 20 g | 0.025 | 0.080 | 0.25 | 0.8 | 2.5 |
| 10 g | 0.020 | 0.060 | 0.20 | 0.6 | 2.0 |
| 5 g | 0.015 | 0.050 | 0.15 | 0.5 | 1.5 |
| 2 g | 0.012 | 0.040 | 0.12 | 0.4 | 1.2 |
| 1 g | 0.010 | 0.030 | 0.10 | 0.3 | 1.0 |
| 500 mg | 0.008 | 0.025 | 0.08 | 0.25 | 0.8 |
| 200 mg | 0.006 | 0.020 | 0.06 | 0.20 | 0.6 |
| 100 mg | 0.005 | 0.015 | 0.05 | 0.15 | 0.5 |
| 50 mg | 0.004 | 0.012 | 0.04 | 0.12 | 0.4 |
| 20 mg | 0.003 | 0.010 | 0.03 | 0.10 | 0.3 |
| 10 mg | 0.002 | 0.008 | 0.025 | 0.08 | 0.25 |
| 5 mg | 0.002 | 0.006 | 0.020 | 0.06 | 0.20 |
| 2 mg | 0.002 | 0.006 | 0.020 | 0.06 | 0.20 |
| 1 mg | 0.002 | 0.006 | 0.020 | 0.06 | 0.20 |
Influence of non temperature- acclimatized weights:
| Weight value > | |||||
| Maximum deviation of the weight for class E1 | 0.030 mg | 0.05 mg | 0.10 mg | 0.25 mg | 0.50 mg |
| Maximum deviation of the weight for class E2 | 0.10 mg | 0.15 mg | 0.30 mg | 0.75 mg | 1.5 mg |
| Maximum deviation of the weight for class F1 | 0.30 mg | 0.5 mg | 1.0 mg | 2.5 mg | 5 mg |
| Displayed error at 10 K temperature difference | 0.3 mg | 0.6 mg | 0.8 mg | 1.6 mg | 2.5 mg |
| Displayed error at 5 K temperature difference | 0.15 mg | 0.3 mg | 0.4 mg | 0.8 mg | 1.2 mg |
| Half-life time of the error | 9 min. | 12 min. | 20 min. | 35 min. | 60 min. |
As shown by these figures, the influence of temperature difference between the weight and the ambient air can be considerably larger than the uncertainty of the weight itself. Therefore weights must be acclimatized before use. When class E1 or E2 weights are used, they must be placed next to the weighing instrument for several hours to acclimatize, otherwise it does not make sense to calibrate with this high accuracy: The error caused by even small temperature differences can be larger than the error of the weight.
scale intervals e | scale intervals e | |||
e | ||||
0.1g | 50 e | 5 000 | 100 000 | |
5g | 20 e | 500 | 10 000 |
For scales with different scale intervals:
scale intervals e | scale intervals e | |||
e | ||||
0.1g | 50 e1 | 5 000 | 100 000 | |
maximum permissible errors:
These are maximum permissible errors on initial verification. The maximum permissible errors “in use” are twice these errors.
Variations in gravity (g) within Holland
| Groningen | 9,81331 |
| Den Helder | 9,81324 |
| Zwolle | 9,81290 |
| Amsterdam | 9,81273 |
| Utrecht | 9,81251 |
| Delft | 9,81241 |
| Dordrecht | 9,81226 |
| ‘s Hertogenbosch | 9,81199 |
| Middelburg | 9,81205 |
| Maastricht | 9,81127 |
Local differences caused by variations in the density of the underground can be up to 1![]() relative. Data taken from report of Technical University Delft.
relative. Data taken from report of Technical University Delft.
Information supplied by courtesy of Zeegert van Huissteden. an engineer with Sartorius Netherlands